Hi there, Chris here. So there you are: You love food. You love to cook. You love the internet. You spend time reading about cooking on the internet. Maybe you love to write too. And photography. You love photography. So why not learn how to start your new food blog?
Have people been telling you to start a food blog? Did it just make sense to you when it was suggested? Well why not? Read on for a few minutes and find out how to start your new food blog the right way.
Don’t wait. Start your food blog today! Follow these steps and tips, and your blog will be up and running in no time.
Disclosure: some of the links below are affiliate links and I will earn a commission if you purchase through those links. I have used all of the products listed below and recommend them because they are helpful and are companies that I have had good experiences with and I trust.
How To Start A Food Blog: 4 Steps
Step 1: Find an internet domain name for your blog
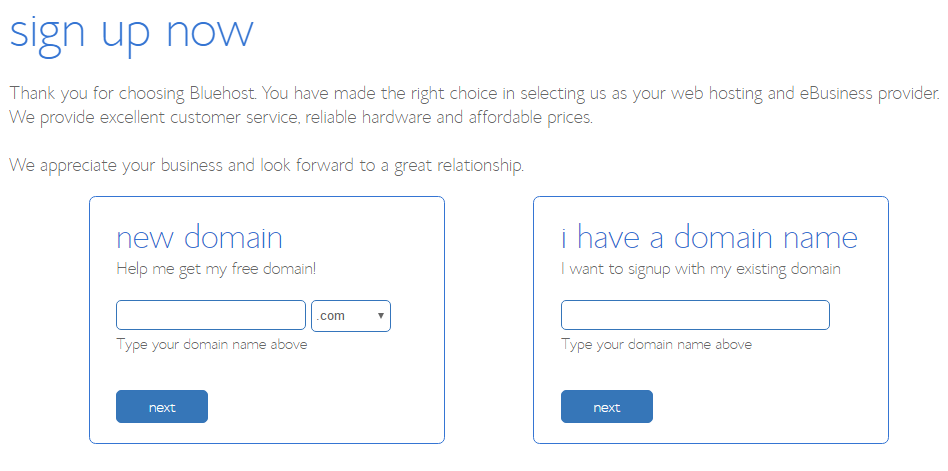
You can visit hosting services by Bluehost.com or Mediatemple.net to begin the process of starting your blog. The pictures below show their domain name look up tools:
- BLUEHOST
- MEDIATEMPLE
 With each of these checkers, you can look to see what internet urls are available to you. You will need to think a bit. Most of the obvious urls are taken already. But come up with something unique and clever and you should be okay.
Step 2: Purchase a hosting service for your blog
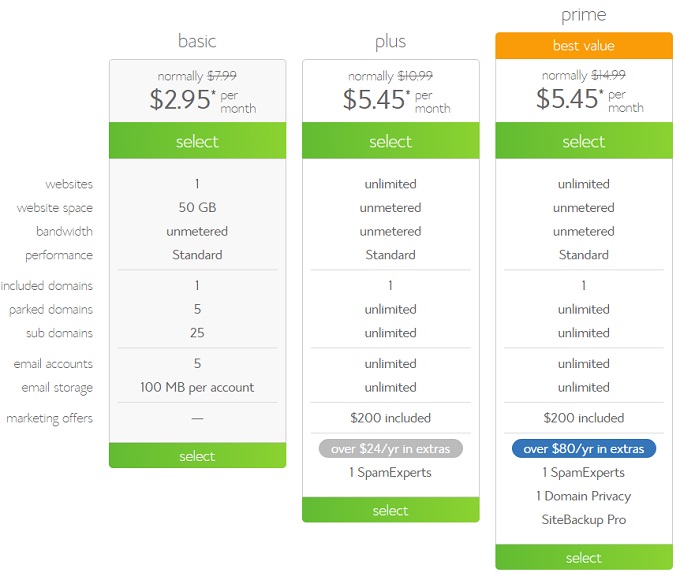
Bluehost is a terrific entry level hosting service that will get you going just fine. But as traffic builds you may feel you need something more. Mediatemple is another hosting service that offers different tiers of service, from basic shared hosting to virtual private servers and more. Mediatemple also offers what they call Managed WordPress Hosting, specifically purposed for hosting blogs and webpages powered by WordPress. I have had a virtual private server with Mediatemple for years and have never had an unplanned outage that I can remember. And the ability to get a quick response on your support tickets by tweeting to Mediatemple Help is a huge plus.
- BLUEHOST
- MEDIATEMPLE
Step 3: Install WordPress
To install WordPress on Bluehost shared hosting service:

Instructions for installing WordPress on a Mediatemple server depend on the particular service you purchase. See the links below for your particular service:
Mediatemple GRID (GS) shared hosting service
Managed WordPress: Mediatemple Managed WordPress
Mediatemple DV VPS with cPanel
Step 4: Get designing
You will want to make your blog more visually appealing than what is available with the built-in WordPress themes. As you may have guessed, you will want a theme that can handle a lot of photographs in a visually compelling way.
If you know a little about WordPress coding, you can re-purpose a non-WordPress theme that you might like for use by WordPress with a few tweaks to the code. There is a terrific book available on Amazon that can you get you started with WordPress theme development:
But remember, as a blogger you are not developing your blog if you aren’t generating content, so don’t put too much time into theme development if you don’t have to. If you are not really a web designer, don’t fret. There are lots of resources out there for you. There are free themes available as a part of WordPress itself and also websites available where you can purchase premium WordPress themes.
Check out the free WordPress themes available at WordPress.com.
Check out premium themes available at: WrapBootstrap and Themeforest. Our first and only theme is the Astrif theme from WrapBootstrap. This theme required a bit of WordPress coding to make it work properly with WordPress. Be careful buying a blog theme, if it doesn’t say it is a WordPress theme, you will have some coding work to do to make it play well with WordPress. WrapBootstrap has actual WordPress-ready themes available as well.
Happy blogging, and come back soon for more of our tips on blogging! Just look in the sidebar for more posts on this topic.


Leave a Reply